


Easy Way To Bird-Proof Your Windows
Bird proofing your windows can be a simple, yet effective way to prevent your parrot from accidentally flying out of the window.

With all the windows properly bird proofed, I can enjoy the beautiful scenery with my Black Capped Conure, Kacy and not worrying about her flying out of the window.
Although the flight feathers of Kacy are always trimmed, it does not indicate that she will not fly out of the window.
Just imagine, in a situation whereby Kacy is startled, she can gain enough flight power and elevation, covering distance just like any flighted parrot. If she is near an open window, she may fly out just like that.
I would rather take the extra precautionary measures to ensure my parrot safety. It’s always better to be safe than sorry.
» Read More…
Tags: Bird Proof, Bird Proofing, Companion Parrot, Parrot, Pet Bird
![]()
![]()
![]()
![]()
![]()
![]()
Posted in DIY Projects | Comments (4)
The first ever Formula 1 night race will be held in Singapore at the late quarter this year. The Formula 1 fever is rising, and everyone is excited!
Kiki is also looking forward for the race too, so I got her a new ride! It’s a purple race car, and Kiki loves it so much!

In fact it’s not really only a new “toy” for Kiki, and a prop for Kiki’s new trick. I’m planning to teach Kiki to “drive” a car, or should rephrase it as pulling the car!
» Read More…
Tags: Bird Toys, Parrot Toys
![]()
![]()
![]()
![]()
![]()
![]()
Posted in DIY Projects, Kiki's Daily | Comments Off on Kiki’s new F1 ride
Earlier on, I mentioned about Kiki mastered the new Cup Stacking Trick on New Year’s Day. My aunt who visited my family during New Year’s Day was really impressed with Kiki’s performance of the new trick. She’s absolutely delighted. Oh gosh! Looks like Kiki is becoming the “centre of attraction” in my family, she got all the attention she wanted. *Jealous*
Lately, I received a couple of emails from friends asking about the Youtube video clip of Kiki performing the new Cup Stacking Trick. Honestly, I’ve yet to get it uploaded to Youtube but Kiki and I are really happy by your warm response. Do stay tune on our weblog and YouTube Channel! I’m sure everyone will get to see the clip by this weekend!
On today’s posting, I will like to share on how I created my own Cup Stacking Props rather than purchasing them off shelves. To be frank, it’s pretty hard to find any parrot trick props from pet’s stores in Singapore. Even you do find one, it’s definitely going to burn a hole in your pocket! Possible problems like the size of the prop might be too big or just unsuitable for our companion parrots. Thus, I do find that making your own props will be an ideal choice. Not only it’s cheap but you also customize the right size just for your own feathered pals.
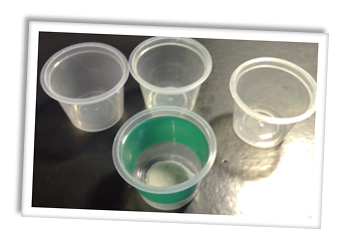
For my Cup Stacking Props Project, I barely spent above two bucks. Sounds amazing right? I’m not kidding and it’s the fact. The items I bought are just a few coins from my pocket from any neighborhood stores.
» Read More…
Tags: Bird Toys, Parrot Toys
![]()
![]()
![]()
![]()
![]()
![]()
Posted in DIY Projects | Comments Off on The Cup Stacking Props
I’m scheduling Kiki to learn how to play basketball. Before getting her to expose to game, I need a decent props. I had been shopping around to different pets stores and even toys retail outlets to find a suitable basketball stand and ball for Kiki, but to my disappointment I couldn’t find one suitable for Kiki’s size. Either it’s too tall or too big. This motivated me start some DIY work. Yesterday, I went to a nearby hardware store to buy the necessary materials for my DIY project.
My Shopping List:
1. Acrylic Plate
2. Wooden Stick (with diameter of around 2cm)
3. Cable Tie
» Read More…
Tags: Bird Toys, Parrot Toys
![]()
![]()
![]()
![]()
![]()
![]()
Posted in DIY Projects | Comments Off on Making of BasketBall Prop